
Show content of a File
Show the whole content:
$> cat filename
Only show every line containing "connection error" of the file:
$> cat filename | grep "connection error"
Here, we use the concept of piping to pass the output of command #1 to command #2
A Unix pipe connects the STDOUT (standard output) file descriptor of the first process to the STDIN (standard input) of the second. What happens then is that when the first process writes to its STDOUT, that output can be immediately read (from STDIN) by the second process. Using multiple pipes is no different than using a single pipe. Each pipe is independent, and simply links the STDOUT and STDIN of the adjacent processes.
Write the result to another file:
$> cat filename | grep "connection error" > /home/userna/err.txt
Count how often the file contains "connection error":
$> cat filename | grep "connection error" | wc -l
wc stands for "word count", the parameter -l for "line count."
Reading a file without open it completly
The cat command (and many others like text editors) will read the whole file. Log files of some programs, such as Apache, can be hundreds of megabytes and even gigabytes. For such purposes in Linux, you can use less. This utility displays the file page by page, no matter its size:
$> less path_to_file
Use the following screen navigation commands while viewing large log files:
- CTRL+F – forward one window
- CTRL+B – backward one window
- CTRL+D – forward half window
- CTRL+U – backward half window
For more options (and there are plenty) see its manpage.
Another option to view such large files is to use the tail command. For example, if we only want to see the last 100 lines of the log file, the command would look like this:
$> tail -f -c 100 path_to_Log
Find a file
search for the file "error.log" in the current directory (and its sub directories) only:
$> find . -type f -name "error.log"
-type f searches for files while -type d searches for directories.
in the entire $HOME directory:
$> find ~/ -type f -name "error.log"
in the $ROOT directory and all sub directories:
$> find / -type f -name "error.log"
To find files thare are larger than a given size, f.e. 100 MB:
$> find . -type f -size 100M
To get rid of permission errors, you can redirect stderr (=file descriptor number 2) to nowhere:
$> find / -type f -name "error.log" 2>/dev/null
File Descriptor:
- 0 = standard output
- 1 = standard input
- 2 = standard error
"Standard input" (file descriptor 0) is the stream from which the program normally reads input. Most of the time that is connected to your terminal, so most of the time what you type will be received over this program over this stream. But you can feed other things into standard input. For instance, you can redirect it to a file (so the program reads from that file instead of the terminal), or you can connect a pipe to it (so the program reads the output of some other program).
"Standard output" (file descriptor 1) and "standard error" (file descriptor 2) are two streams over which the program can produce output. Most of the time they are both connected to your terminal, so most of the time the output will be displayed there, but again you can change this by redirecting them to a file or to a pipe.
By convention, programs should produce warning and error messages on standard error, and "all other output" on standard output. This means you can redirect standard error to a file, yet leave standard output connected to the terminal so you can continue to read the normal output produced by the program while keeping some kind of error log for future analysis. Or vica versa^^
Show the difference between two files
$> diff db.conf db.conf.bak
Text Manipulation
The Stream Editor – sed – is used for text substitution, deletion, and text manipulation. It operates on a line-by-line basis and is often used in scripts for automated text editing. For example, to replace all occurrences of “old” with “new” in a file:
$> sed 's/old/new/g' file.txt
A versatile text processing tool, awk excels at processing structured data, such as CSV files. It allows you to define custom actions for each line or record in a file. For instance, to print the second field (column) of a CSV file:
$> awk -F',' '{print $2}' file.csv
Sorting and Filtering Text
The sort command arranges lines in alphabetical or numerical order. For example, to sort a text file named data.txt:
$> sort data.txt
The cut command allows you to extract specific columns from text files, making it useful for parsing structured data. To extract the first and third columns from a CSV file:
$> cut -d',' -f1,3 file.csv
The command uniq is used to filter out duplicate lines from sorted text:
$> sort file.txt | uniq
Reusing the last argument from a previous command
The argument of the previous command is always useful in various situations. For example, if you just created a directory and want to visit it
$> mkdir /tmp/folder_with_a_very_very_long_name/
you don't have to type in the long folder name again, just do this to cd into it:
$> cd !$
Reuse the previous command
When you need to run a command and realize that it needs root privileges, you don't have to type in the command a second time, just use !!
$> sudo !!
System Logs
Troubleshooting system issues often involves examining logs and messages. The journalctl command provides access to the systemd journal, which contains logs for various system services and events. This tool enables you to view and filter log entries, making it invaluable for diagnosing system issues. To display recent system logs:
$> journalctl -xe
Filtering by priority level:
$> journalctl -p warning
Filtering by a Keyword for a given DateTime Range:
$> journalctl -g "error" --since "2025-06-30 10:00:00" --until "2025-06-30 11:30:00"
Filtering by multiple Keywords:
$> journalctl -g "error" -g "warning"
Check Status of PostgreSQL
How to check if the Postgres Service is active:
$> sudo systemctl is-active PostgreSQL
How to check if the Postgres Service is enabled:
$> sudo systemctl is-enabled PostgreSQ
How to check if PostgreSQL is ready to accept & recieve User Connections:
$> sudo pg_isready
Alternative 1 - Is PostgreSQL up & running:
$> curl -I htpps://localhost:5432
Alternative 2 - Is PostgreSQL up & running:
$> nmap -p 5432 -sV myhost
This uses nmap to perform service and application version detection on the database
Aliases
Aliases are like custom shortcuts for your commands. You can create your own shorthand for frequently used or complex commands. For example, if you often find yourself typing ls -l to list files in long format, you can create an alias like this:
alias ll='ls -l'
You can add aliases to your shell configuration file (e.g. ~/.bashrc for Bash) to make them available every time you open a terminal session. The ll alias is available per default on many different UX/LX distros (sadly not on all).
# clear console
alias c='clear'

## a quick way to get out of current directory ##
alias ..='cd ..'
alias ...='cd ../../../'
alias .4='cd ../../../../'
alias .5='cd ../../../../..'

## Colorize the grep command output for ease of use (good for log files)##
alias grep='grep --color=auto'
alias egrep='egrep --color=auto'
alias fgrep='fgrep --color=auto'

alias h='history'
alias now='date +"%T"'

#show open ports
alias ports='netstat -tulanp'
# install with apt-get
alias apt-get="sudo apt-get"
# become root #
alias root='sudo -i'
alias su='sudo -i'

## pass options to free ##
alias meminfo='free -m -l -t'

## get top process eating memory
alias psmem='ps auxf | sort -nr -k 4'
alias psmem10='ps auxf | sort -nr -k 4 | head -10'

## get top process eating cpu ##
alias pscpu='ps auxf | sort -nr -k 3'
alias pscpu10='ps auxf | sort -nr -k 3 | head -10'

## Get server cpu info ##
alias cpuinfo='lscpu'
CHMOD explained
The command ls -l (or its alias ll) lists all file properties, including the RWX (read/write/execute) properties for
- User
- Group
- Others
like for example
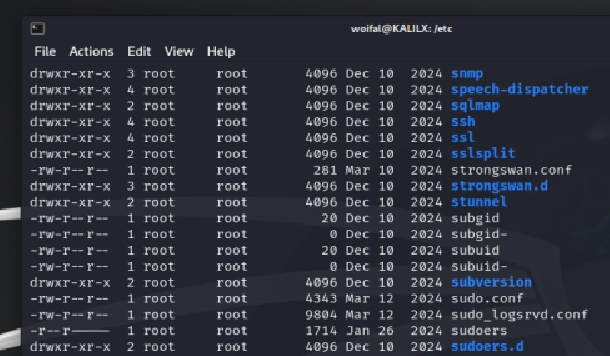
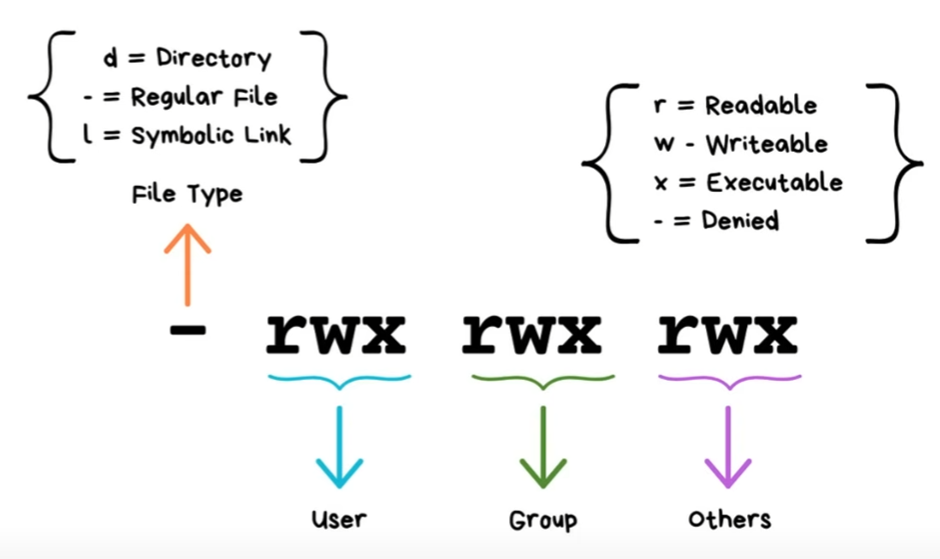
The first entry in the output returns eiter "-" for a file or "d" for a directory (or "l" for a symbolic link) followed by R/W/X for user then group then others:
CHMOD is working with numbers:
- 4 = Read
- 2 = Write
- 1 = eXecute
Common types:
chmod  777  file.sh      # FULL (RWX for all)
chmod  755  file.sh      # owner: RWX, all others: RX (scripts)
chmod  644  file.txt     # owner: RW, all others: R (default for TXT)
chmod  600  file.txt     # owner: RW, all others: none  (=private)
Memory Management
Show free RAM:
$> free -h
Show free Memory on File System:
$> df -h
Show the size of a Directory:
$> du -sh /dir
Show the largest 10 directories of the file system:
$> du -hsx / | sort -rh | head -10
The parameter -x for the du command is used to search only a single filesystem. This is required particuarly if you just want to search the root ('/') filesystem only.
Since the sort command by default would sort by ASCII-Code, we have to use the -h parameter in order to sort real numbers.
This can take quite some time to complete, depending on your file system. If you have remote filesystems mounted, you should unmount them before running the command above. Or consider to run a cronjob once a day and write the output to a file because on large file systems it could take hours to complete.
Show the 10 largest file in a directory and its subdirectories:
find /path/to/dir/ -printf '%s %p\n'| sort -nr | head -10